
티스토리 뷰
HOW TO INSTALL LAMP ON CENTOS 7 (httpd, php, mariadb, myphpadmin)
rediate.will 2019. 4. 24. 13:30INSTALL APACHE WEB SERVER
Being the most popular web server, Apache is commonly included in most of recent Linux Distro so installation will be very easy.
Before you proceed to the next steps, it is better to explain that all commands in this tutorial are written without the “sudo” prefix. In this tutorial I use root but you may alsologin as separate user with root privilege. However if you disabled root login and you logged in using another username with root privilege, you can add the “sudo” prefix all by your self. Alternatively you can simply type su, hit Enter and type in your password twice to switch as root.
Step 1 – Login to your server via Putty or Terminal.

Step 2 – Now issue command below to install Apache 2.4 on your CentOS 7 server:
|
1 |
yum install httpd -y
|
As you can see the command is still the same.

And when the process finished, you’ll see something like this:

Step 3 – Now you have Apache 2.4 installed which you can then start the service by typing command below:
|
1 |
systemctl start httpd.service
|
or,..
|
1 |
service httpd start
|

Available commands:
|
1 2 3 4 5 |
systemctl status|start|stop|restart|reload httpd.service
# OR, old command :
service httpd status|start|stop|restart|reload
|
Step 4 – You can verify that Apache is really running by opening your favorite web browser and access your vps via its IP address:
and you’ll see default Apache welcome page.
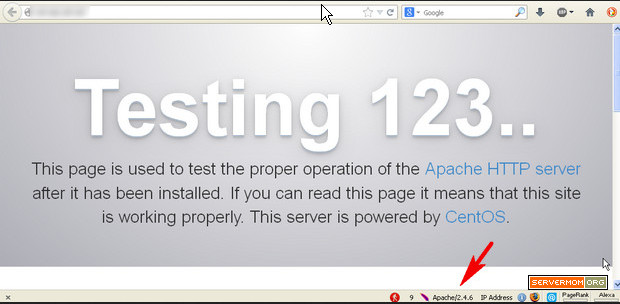
In current example I’ve installed Apache v2.4.6.
or, you can directly issue this command:
systemctl status httpd.service
you’ll see something like this:

Enable Apache to automatically run every time your server reboot:
|
1 |
systemctl enable httpd.service |
INSTALL PHP5 -삭제
INSTALL PHP7
먼저,
| # yum info php | egrep 'Name|Version' |
하면 인식되는 php이름이랑 버전이 나올것인데, 대충 버전 결과값이 5.4로 되어있을것임.
이펠 설치 안되어 있음 이펠 설치하자. 아마 yum update했으니까 안깔아도 깔려있을거임
| # yum -y install epel-release |
그리고 레미? 리미? 저장소 깔자. 그리고 php7버전을 활성화 시켜주자.
| # yum install http://rpms.remirepo.net/enterprise/remi-release-7.rpm
# yum-config-manager --enable remi-php72 |
만약 여기서 yum-config-manager 명령어를 찾을수 없다고 나오면,
# yum install yum-utils
한번 설치 해주면 먹힌다.
php 7.2 설치
|
# yum install -y php # php -v
PHP 7.2.18 (cli) (built: Apr 30 2019 15:26:52) ( NTS ) Copyright (c) 1997-2018 The PHP Group Zend Engine v3.2.0, Copyright (c) 1998-2018 Zend Technologies |
INSTALL MARIADB MYSQL SERVER
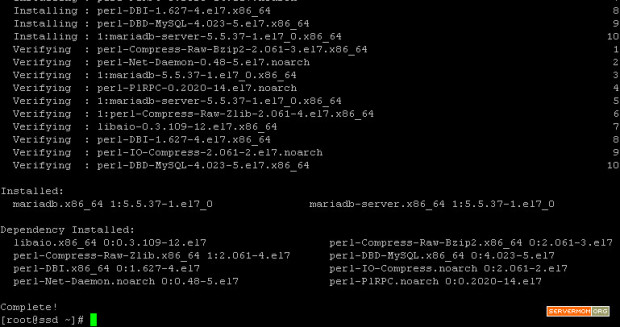
Step 6 – Installing MariaDB mysql server on CentOS 7 is pretty easy and once again we’ll make us of yum package manager:
|
1 |
yum install mariadb-server mariadb -y |

and once done you’ll see something like this:
Step 7 – Now you can start MariaDB server for the very first time using this simple systemctl command :
|
1 |
systemctl start mariadb.service |

You may also see the status of MariaDB by typing:
systemctl status mariadb
MARIADB INITIAL CONFIGURATION
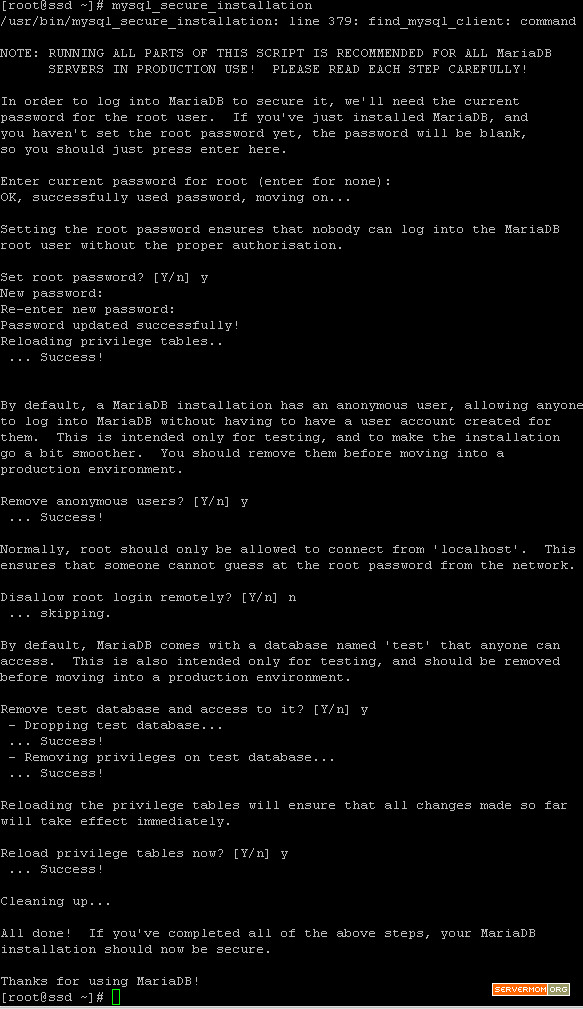
Step 8 – So its service is now running but there is one thing you should do immediately: configuring MariaDB setup for the very first time like setting up your mysql root password. Issue this command:
|
1 |
mysql_secure_installation |
Then you’ll see a series of question, just answer it accordingly. The main important part is to define your root password while everything else is just up to you or you can simply hit the “ENTER” key through each prompt to accept the default values.
If you need to automatically run MariaDB everytime your server boot, simply issue this command:
|
1 |
systemctl enable mariadb.service |

You may also need to test your newly installed MariaDB by logging in as root:
|
1 |
mysql -u root -p |
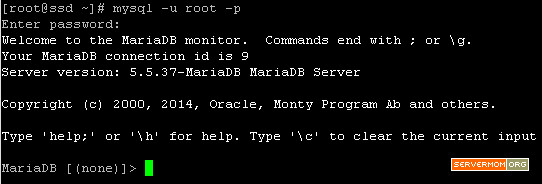
As you can see from the screenshot above, it is Maria DB v5.5.37.
Step 9 – Also test if Apache and PHP is running well and able to process any *.php files. Create a php info page using this command followed by restarting apache
|
1 |
echo "<?php phpinfo(); ?>" > /var/www/html/info.php |

Restart apache:
|
1 |
systemctl restart httpd.service |
Now open up your browser and access that newly created php page:
http://xxx.xxx.xxx.xxx/info.php
You’ll see a page similar to this one:
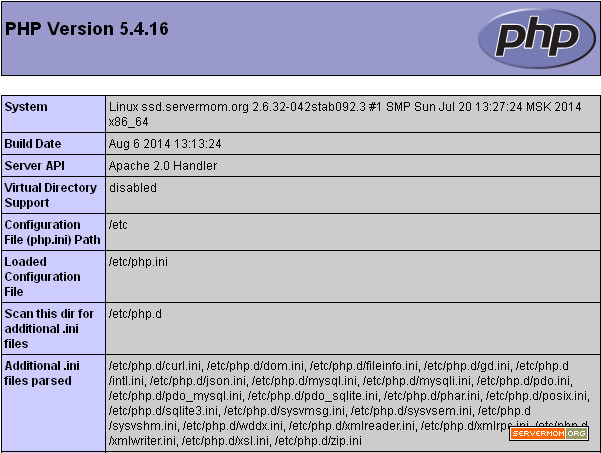
+ firewall configure -> info.php 페이지가 보임
3. On the next step start Apache service using systemd init script and open RHEL/CentOS 7.0 Firewall rules using firewall-cmd, which is the default command to manage iptables throughfirewalld daemon.
# firewall-cmd --add-service=http
NOTE: Make notice that using this rule will lose its effect after a system reboot or firewalld service restart, because it opens on-fly rules, which are not applied permanently. To apply consistency iptables rules on firewall use –permanent option and restart firewalld service to take effect.
# firewall-cmd --permanent --add-service=http # systemctl restart firewalld

Enable Firewall in CentOS 7
Other important Firewalld options are presented below:
# firewall-cmd --state # firewall-cmd --list-all # firewall-cmd --list-interfaces # firewall-cmd --get-service # firewall-cmd --query-service service_name # firewall-cmd --add-port=8080/tcp
+ 이어서 계속
INSTALLING PHPMYADMIN
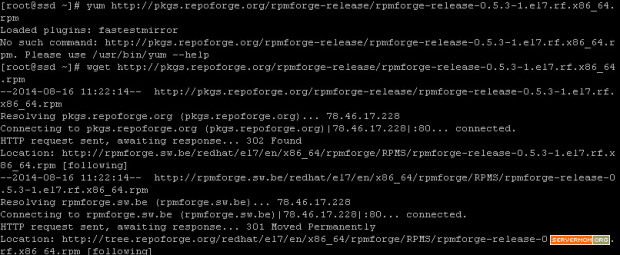
Step 10 – Now your server has Apace, PHP and MariaDB installed. It means it should be OK now to install PhpMyAdmin, a popular web-based database management system so you can easily manage your database without having to login via SSH and issuing several command lines. Unluckily, this piece of awesome software is not available in CentOS 7.0 default repositories. In this case you have to add / enable third-party repo like EPEL orRPMForge.
Method #1: RPMForge
First, download the rpm file.
|
|
|
then enable the repository and delete the .rpm file as it is not needed again.
|
|
|

Method #2: EPEL
Download the .rpm file:
|
|
|
The url above is still its beta version. However if the repository is out of beta status, the link most likely will be different. In case that happens, you can find out its latest download url at Fedora Project website.
enable the repository and delete the .rpm file:
|
|
|
Step 10 - epel저장소 추가 및 인스톨
yum install epel-release
yum update
2. 그리고 나서 phpmyadmin을 설치해주자.
yum install phpmyadmin
Step 11 – Next, install it using yum again:
|
1 |
yum install phpmyadmin -y |
screenshot:

Step 12 – That’s it. Now you also have phpMyAdmin (PMA) installed but you should be better if you change its default configuration before using it. First, you’ll need to backup default PMA’s config file:
|
1 |
cp /etc/httpd/conf.d/phpMyAdmin.conf /etc/httpd/conf.d/phpMyAdmin.conf.old |
then edit file phpMyAdmin.conf file using your favorite editor. In this example I use Nano editor:
|
1 |
nano /etc/httpd/conf.d/phpMyAdmin.conf |
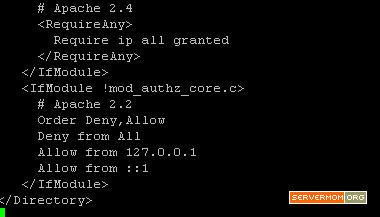
Step 13 – You’ll now see the content of phpMyAdmin.conf, next you have to allow connections from remote hosts by editing few lines inside section <Directory “/usr/share/phpMyAdmin”>.
Before changes:

After:

Also you’ll need to edit few lines next:
Before:
After:
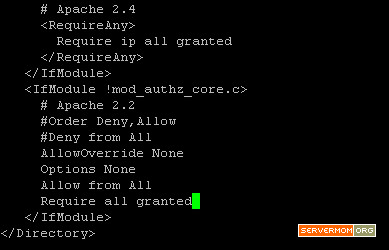
Shortly it should look like this:
|
1 2 3 4 5 6 7 8 9 10 11 12 13 14 15 16 17 |
<Directory /usr/share/phpMyAdmin/> <IfModule mod_authz_core.c> # Apache 2.4 <RequireAny> Require all granted </RequireAny> </IfModule> <IfModule !mod_authz_core.c> # Apache 2.2 #Order Deny,Allow #Deny from All AllowOverride None Options None Allow from All Require all granted </IfModule> </Directory> |
Once done, save and exit editor (In Nano it is Control+O then Control+X).
Step 14 – Restart Apache again::
|
1 |
systemctl restart httpd.service |
Now you can test opening PMA on your browser via your server’s IP address:
http://xxx.xxx.xxx.xxx/phpmyadmin
and default login page of phpMyAdmin should be displayed:
That’s all. Now you can host your websites or blogs in that server, even WordPress.
Do not forget to follow me on twitter to get faster update or download my official Android app. Enjoy..
'SERVER' 카테고리의 다른 글
| [Laravel5] 필드 리스트를 받아보자. (0) | 2019.06.24 |
|---|---|
| [laravel] 이제 윈도우에서 발렛파킹해보자. (0) | 2019.05.15 |
| [Laravel] LAMP에 라라벨 설치하기 (0) | 2019.05.08 |
| DB 캐릭터셋 (0) | 2019.04.30 |
- Total
- Today
- Yesterday
- fmf
- 더미데이터도유형이있어요
- PhpStorm
- gcp
- 테스팅환경
- 테스팅
- 프로그래밍은디버거부터시작이다
- JSON으로도
- xml로도
- UTF8
- twoserven.kr/0410
- twoseven.kr/0410
- Testing
- 배열을_이쁘게
- 엘라스틱서치한글성공!
| 일 | 월 | 화 | 수 | 목 | 금 | 토 |
|---|---|---|---|---|---|---|
| 1 | 2 | 3 | 4 | 5 | 6 | 7 |
| 8 | 9 | 10 | 11 | 12 | 13 | 14 |
| 15 | 16 | 17 | 18 | 19 | 20 | 21 |
| 22 | 23 | 24 | 25 | 26 | 27 | 28 |